The Making of a Carousel Lantern
 Little Island

by Lucy Kelly-Desmond
In this special guest blog post, author and illustrator Lucy Kelly-Desmond shares the inspiration for her book The Horse, the Stars, and the Road (out now) and how she created the beautiful carousel lantern which we see in the story. You can see the real lantern along with Lucy’s illustration at the end of the post.
I had the idea that I wanted to write a story about a tinsmith and a special lantern after seeing a tinsmith working at the Ballinasloe Horse Fair and at a Traveller Pride event in Roscommon. I was struck by people’s reactions as they watched, with admiration and nostalgia, this dying craft.
I had considered coming up with the carousel in an illustrated form like the rest of the story, but thought that if I was going to write about a tinsmith and the creation of a lantern carousel, then it would be very helpful if I had an idea of what it would look like in reality and how it might be made. I had already bought some sheets of copper and bronze mesh so I decided I would have a go at making a carousel inspired by tin and copper Traveller
lanterns.
This was before beginning work on the book, so I knew I would also need to spend time developing the story ideas and exploring illustration styles. I knew I wouldn’t have a lot of time to master new metalwork skills so I learned two: burnishing and embossing. For the rest of the steps in making the lantern, I relied on my textile training. The piece took just over 4 months to make from start to finish. Here are some of the techniques explained:
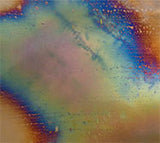
Burnishing – this is an effect that creates patterns of colour similar to an oil-spill rainbow. The metal reacts to heat and changes colour depending on the level of heat it is exposed to. Once I was happy with the colours, I put the sheet of copper into a bucket of water. This fixes the colour so that it remains the same when it has cooled down.
 .
. 
Samples of burnished copper sheets
The second metalwork technique I used was embossing – a design of grass and cart wheels above and below each horse was embossed into the copper. This effect is achieved by pressing the image with a stylus into the back of the metal. The image will stand out in relief when viewed from the front.

Detail from an embossed panel
For the other stages I used textile techniques which I was much more familiar with. The bronze mesh was hand stitched behind each horse with metallic thread. As the copper sheeting and bronze mesh are very fine I was able to sew them together.
 .
. 
Stitching the bronze mesh into the copper panels
Because the copper sheeting was extremely thin, I was able to construct the piece by stitching the roof and side panels together on my sewing machine.
The final stage was to pierce tiny holes in the roof for the stars. I used various thicknesses of needles, from embroidery to tapestry, depending on the size of the star. Using a diagram of a planisphere (map of the stars) as a guide, I punched a hole for each star through the copper roof.
 .
. 
Adding stars, and the finished carousel lantern
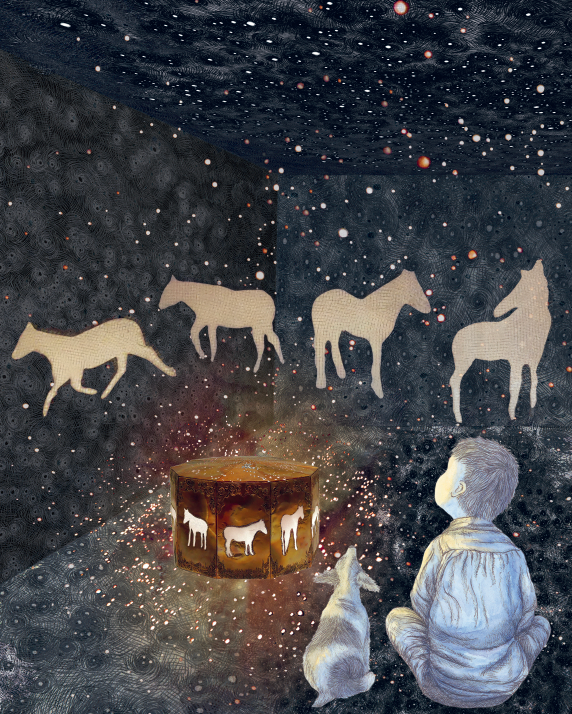
When a light is placed inside, the carousel lantern projects stars onto the ceiling and horses on the walls of a darkened room.
 .
. 


The lantern in action

Illustration from The Horse, the Stars and the Road by Lucy Kelly-Desmond. The Horse, the Stars, and the Road is out now.
Share Article
- Tags: author blog, illustrator blog